How to set up categories using WordPress and Showit
If you want to find books about baking mouth-watering birthday cakes, you choose the section of cooking books in the library. You don’t walk the aisles of true crime novels.
Categories are like those aisles in the library. You set up clear signs so your reader knows where to go. You want to help your visitor as much as possible to find what she’s looking for. She doesn’t want to waste her time.
Your goal is to create a strategic website. One way to do that is to organise your blog posts so that your visitors can find what they want with little effort. And keep her interested in staying on your blog.
Then, how do you set up the categories on your website?
How many categories should a blog have
Don’t worry about having an exact number of categories. Create something between 3 and 5 categories. Think about creating the number of categories that make sense to you and your readers.
You can name as many categories as you wish, but consider how you can best help your reader. It’s not helpful for her to see many categories with only a few blog posts each.
You want to signal to your visitors that your blog is focused on a special theme. If you cover too many subjects, you’ll confuse your reader. Aim for organising your site with a clear structure. It helps your reader, and it helps the search engines to understand what you’re writing about.
Are you unsure which categories to use? Think in broad terms, using words your reader understands and wants to learn more about. You can always create subcategories for your main categories as long as the structure feels organised.
Do you grow tired of a category? You can always change it to another name if the category no longer suits your blogging goals.
The key is to aim for an organised site with a clear structure. It helps the search engines to understand the topics that you’re blogging about as well.
When you have decided on your categories, it’s time to set them up in WordPress. The categories you make will appear on the front page of your blog. Not your website, but the blog page.
How to set up categories using WordPress and Showit
The first step is to define some categories in WordPress; then you’ll add the buttons in Showit.
- Log in to WordPress and navigate to Posts > Categories
- Click on Categories

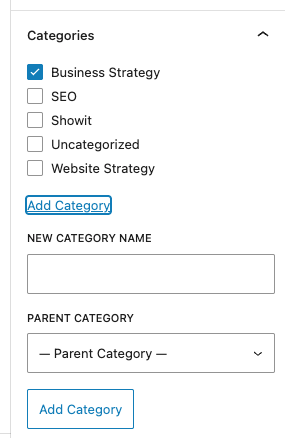
Create a new Category by entering a name for your category in the Name field. The name is what your visitors see on your website.
Enter the name again in the field called: Slug. It’s used in the URL. For example. Www.yoursite.com/recipes
The slug is usually written in lowercase. If your category consists of two words, then write a hyphen between the two words, like chocolate-recipes.
When done click on Add Category to save it.
Tip: Good practice for URLs. Don’t have this URL /sitename/category/ blogposttitle. If you ever decide to move a blog post to another category, you’ll get a broken link. Use instead this structure of an URL: sitename/blogpostname. The search engines are indexing the blog article and remember the link. If you change the link later, the search engine will not be able to find the article, as it only remembers the first link, not the updated one.
How to add categories to your blog post
- Write a new blog post or open a blog post that you’ve already written.
- Locate the Categories to the bottom right of the screen.
Mark the relevant category for your blog post with a check mark. If you want to add a new category, you can also do it from here. Then click on Save to save your blog post. You can always go back to your blog post and edit your categories or tags.
How to add the categories in Showit
Now it’s time to add some buttons to your Showit website
Summary
I’m a big fan of categorising and structuring things. Using categories makes it easy for your visitors to understand the main subjects on your blog. She can choose a category and read more about that subject.
Now it’s time to map out some categories and add them to WordPress. Remember, you can always change them later if you change your mind.
